Now, plug the 25-pin connector which is on one one end of your parallel cable, into the mating parallel port connector on the back of the PC. It only goes in one way, so if you are having problems, try turning it upside down. Never force any connector!
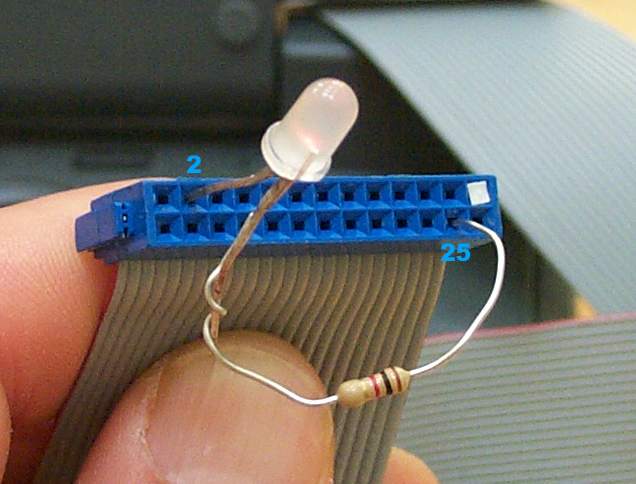
Using the 26-hole connector at the other end of the parallel cable (seen
below), insert the LED's anode (longer wire, below the smaller "thingy"
in the LED) into hole #2 of the parallel cable adapter. Insert either
of the resistor's leads into hole #25. Then wrap the resistor's other
lead around the LED's cathode (remaining shorter wire, connected to the
larger thingy). Now we will turn the LED on:
For our first experiment, we will use QBASIC's "immediate" mode-- all
commands will be executed after pushing the <Enter> key:
1. Push F6 (this puts QBASIC in immediate mode)
2. Type: out 888,1
3. Push the <Enter> key. (Your LED should now be on!)
4. Type: out 888,0
5. Push the <Enter> key. (Your LED should now be off.)
If this does not work, carefully check each connection, making sure
you have inserted the LED and resistor leads into the correct holes, and
that the LED is not connected backwards.
If you have successfully commanded your LED to light and turn off, you are ready to write your first program:
1. Press F6 again, or click on the upper window-- this will bring QBASIC
into program mode.
2. Type:
CLS
INPUT "enter count value
for speed control: ", speed
FOR counter = 1 TO 10
OUT 888,1
FOR zz = 1 TO speed: NEXT
OUT 888,0
FOR zz = 1 TO speed: NEXT
NEXT
3. Press Shift-F5 to run the program. When you are asked for a count value, try 10000. The larger the number, the slower your LED will blink. Try this program a number of times (press Sh-F5 each time to start it) with different count values. ( If you enter a huge value, and the program is taking so long that you want to interrupt it, push Ctrl-break.)
Congratulations! You have now written a program which controls a real-world object. If you look at the program, you can probably make out what is happening-- but here is the full explanation:
CLS -- this tells QBASIC to clear
the screen (so that you don't have to look at the text from running the
program before)
INPUT "enter count value for speed control:
", speed -- asks the user to enter a number, which is then assigned
to the variable called "speed."
FOR counter = 1 TO 10-- "counter"
is the name of the variable which keeps track of how many times we want
the LED to blink, in this case, 10.
OUT 888,1-- turns on bit #0 (which
is connected to wire and hole #2). Electricity then flows through
the LED and resistor to ground (which is connected to hole #25 in the PC's
parallel port).
FOR zz = 1 TO speed: NEXT
-- tells the computer to count to the number you entered. This takes
time, and makes it possible to slow things down enough for us to see the
LED stay on.
OUT 888,0-- turns bit #0 (and the
LED) off.
FOR zz = 1 TO speed: NEXT
-- just like before, only now it allows us to see the LED stay off.
NEXT -- this
tells the program to go back up to the For statement. If "counter"
has not reached 10, then all the stuff between is repeated.
Try making some changes-- like changing the counter
maximum to 25, or anything you want.
Try changing the out
888,1 statement to out
888,2. If you then run the program
you will notice that your LED does absolutely nothing! That is because
you are now turning on and off bit #1 (wire and hole #3), but
your LED is not connected to this bit (it is connected to #0).
A simple change of where you insert the LED's anode into the 26-pin connector
will fix this. Can you guess where it goes?